|
 |
|

|
|
How to Fix Memory- Part Two
|
Thursday, June 1, 2000
In part-1 we discussed about the basic technique on how to find and fix a memory failure.For those who have missed part-1 , Click Here
First of all, I have to apologize to all those readers who have been waiting for this long overdue article.Well I have been swamped with work in recent weeks, and lately been suffering from a severe allergy attack. Right after the memorial holidays and with enough rest, and not to procrastinate any further lets get on with part-2. I have to apologize to all those readers who have been waiting for this long overdue article.Well I have been swamped with work in recent weeks, and lately been suffering from a severe allergy attack. Right after the memorial holidays and with enough rest, and not to procrastinate any further lets get on with part-2.
This section is written with the assumption, there is a general understanding of basic PC operating system, in order for you to be capable of performing the diagnostic procedures detailed below.
We will try to describe the entire process in detail, however it is beyond the scope of this article to provide all the necessary information to cover all possible PC system failures. For further assistance with non-memory related failures, please consult your PC manual or manufacturer support help online system.
If your particular question is not addressed in this section,please send me an email Contact DocMemory Now and we will do our best to provide you with the right answers.
Part-2 will discuss issues on:
* Troubleshooting memory using BIOS Beep Codes
* What is a Memory Diagnostic Software?
* Test-run with DocMemory Diagnostic
* Basic trouble shooting techniques with DocMemory
* What is a Hardware memory tester?
* Test run with CST SP3000 Memory Tester
* Basic trouble shooting technique with the SP3000
Introduction
Imagine you have followed the instructions given in part-1 and you have found a defective memory - so what's next?
a) You need to find out the caused of the memory failure, was it caused by defective memory chip or a mechanical failure?
b) Find out what diagnostic tools are available for diagnosing the memory failure?
c) Finally you have to decide if you need to spent added investment to buy new memory or get it fixed at a local PC repair shop?
Simple Tricks
The simplest way to find out the caused of the memory failure is by using your senses for instances your eyes to visually inspect the module and to smell for burnt- components.Electronic Component commonly found zapped are DRAM chips, Capacitors, resistors and occasionally the memory PCB boards.
Frequent caused of defective memory are, power-surge during power failure, aging components and human error due to mishandling.
If no components are found defective than you will require some hardware and software diagnostic tools to help you determine the failure.
Basic Equipments Required
In this exercise, we will continue to use your existing PC as a test station.
Motherboard Diagnostic
When you are experiencing memory failures on your PC system, there are several common faults to determined, check the following:
* PC system does not boot-up
* HIMEM.SYS does not load
* Memory failure due to PC hanging up, or PC rebooting running a large program.
* Fail to install win3.1, Win95,98 and Win NT
* Windows program is unstable
* Continuous beeping sound emitted by system during power up
* Continuous ram count during boot-up, without loading Windows program
* No display other than blue screen on the monitor during boot-up
* Totally no video display on the monitor.
* System hang or rebooting after prolong usage.
All of the above are typical of memory related failures, you need to be either well trained or PC knowledgeable to be able to perform the correct diagnostic methods. However, there are some basic rules that may be taken to pinpoint defective modules when using a memory diagnostic software as an aid.
Troubleshooting memory using BIOS Beep Codes
The BIOS on the motherboard will always perform a power-on-self-test (POST) during power up, usually this test is perform to ensure proper system function and if a failure occurs during the POST, it will identify the failure and emits a beeping sound to prompt the service technician to take corrective action ASAP.
The exact meaning of the beeping codes varies from different BIOS developers, there are 3 basic BIOS developer today, the most popular BIOS is made by "American Megatrend¨ - AMI, Award and Phoenix BIOS. The beep codes for this AMI & Award BIOS developer are provided in this memory troubleshooter guide, we do not provide beep code reference for Phoenix BIOS and custom BIOS written by other companies other than the two mention.
Beep codes are not entirely consistent sometimes to detect the exact failures, but generally it is still the most dependent methods to diagnose a fault without opening up the PC system or using any diagnostic software.
To browse Beep codes instruction: Click Here
Software Memory Diagnostic
Memory Diagnostic Software are stored on a bootable single floppy disk which allows the diagnostic program to test the Base memory to the highest memory available in your system.See illustration.

The main drawback of a diagnostic software is that the PC must function well enough to boot otherwise it will not be able to detect "dead module".
Most memory diagnostic software available typically have basic test pattern to test and stress your main memory, an error message will usually flag you to pay some attention to replace any defective memory.
One of the key feature of diagnostic software is the "burnt-in mode" test feature that will provide extreme exhaustive test coverage, any memory either with "Non-permanent " failure might be detected using this mode.
Memory diagnostic software does not have the capability of most hardware memory tester such as automatic identification feature, open and short test, preheat test etc, therefore software diagnostic are targeted for only PC technicians or hobbyists that builds and upgrade PC system in small numbers. In our article we will use DocMemory a freeware as the diagnostic software.
Downloading A Free RAM Diagnostic Software
Typically you may want to begin by finding out if it's a memory-related problem using a diagnostic software. CST's DocMemory RAM Diagnostic software is designed for this very purpose.
You can start by downloading a copy of the software from www.simmtester.com
or Download Now
Follow the setup instructions and run a diagnostic test on your PC memory.

DocMemory Diagnostic
CST Inc has created a very impressive software memory diagnostic tool, called DocMemory. The diagnostic is installed on a single floppy disk, is self-booting, which allows the software to access memory at the lowest level possible.See test screen.

DocMemory has two modes of operation - 'Quick Test' and 'Burnt-in' Test mode' - users can select which range of memory to test base or extended, the number of loops and which memory tests perform.

The software automatically starts in 'burn-in' mode, which rigorously tests Base & Extended memory with most of the possible memory patterns.
Base Memory Test
Base Memory is the conventional memory cells below 1 Mbyte, available for testing in the RAM module.( eg. address 5000H ~ A000H)
If the user enables this option, a normal Run_Test will be carried out on the Base memory locations, based on the selected test pattern.
Extended Memory Test
Extended Memory refers to the memory locations that are above 1Mbyte to the maximum amount of Ram installed in a typical PC system (eg: 1M ~ 32 Mbyte; 1M ~ 256 Mbyte).
There are over 10-industry standard memory tests build into the software, to be used to detect faulty memories.
Test Run DocMemory Software
A Typical Test Time for 32 MB SDRAM PC-100 Memory running on an Intel Celeron 400 Mhz processor, will take approximately 2 Minutes to complete a full cycle test- if the Quick Test is selected. Test time varies from different system, it is dependent on your processor speed, and the type of memory used.See illustration for Test Screen.

Interpreting Test Results
From the test result shown in the illustration¡V there are two failures : Base Memory and Extended Memory :
1) Base Memory Test ( 7F090 , A0000 )
MATS + Loop 1 ................................. Fail
* Addr : 0007F090 ( 506K) , Exp : 55aa55aa , Act : 01500150
Short Form:
Addr = Address
Exp = Expected
Act = Actual
Interpretation for Test Failure-1 ( Basic Test)
Base Memory range starts from 0K to 640K , this is where the Basic DOS operating system will occupy during Booting Up. Failure were encountered at address location :0007F090 or memory range at 506K
The MAT-S, Test pattern had detected failure by writing a set of data pattern [55aa55aa] into memory range location at 0-640K. In order to detect if any of the memory cell is defective from range 0-640K. DocMemory will try to read back the data pattern and match [55aa55aa]. If it the readback data pattern does not match [55aa55aa] DocMemory will detect the fail location. In this example the readback data was [ 01500150] , which is incorrect.
2) Extended Memory Test ( 7F090, A0000 )
MATS + Loop 1 ................................. Fail
* Addr : 00100000 ( 1M) , Exp : 55aa55aa , Act : 21802180
Interpretation for Test Failure 2
Extended Memory range starts from 641K onwards, this is where Windows operating system and other software application will occupy, see Memory Map of a PC system install with 32MB memory.
Failure were encountered at address location :00100000 or memory range at 1M.
The MAT-S¡¨ Test pattern had detected failure by writing a set of data pattern [55aa55aa] into memory range location at 641KB to 32 MB. DocMemory had detected the fail location at 1 Mb. In this example the readback data was [21802180] , which is incorrect.
Action after Analysing the Test Results
From the test results , we know that failure had been detected at two location 504K ( Base Memory) and 1M ( Extended Memory). Since the example uses only one piece of 32MB DIMM, the single defective module will have to be replaced
The main drawback of most software diagnostic is that you must have memory which functions at least well enough to boot with, so it will not be able to verify 'dead' modules. For this, you will need a hardware tester.
The second drawback of diagnostic software is its inability to pin point which chip is defective. DocMemory is only capable of detecting memory failure range, you can download the troubleshooting guide, which can be downloaded.
If all Memory tests results returns good, you will need to isolate and examine other possibilities such as CPU, Motherboard or other peripherals that you have in your PC.
Some techniques for troubleshooting Memory failure using Software Diagnostic.
1)Removing the modules one by one from motherboard
This is simplest method for isolating a failing module, but this may apply only if the motherboard have more than one module on the SIMM or DIMM Slot. By selectively removing module one at a time from the system and then running the test you will be able to find the bad module very quickly. Be sure to mark the module that passes or when it test fails.
2)Swap the modules around
When none of the modules can be removed, swap and rotate modules to find which module is defective. This technique can only be used if there are two or more modules in the system. Change the location of two modules one at a time.
For instances, place the module from SIMM slot 1 into slot 2 and place the other module from slot 2 in slot 1.
Run the diagnostic test and if either the failing data bit or address changes, you know that one of the module you have just swap is defective. By using several combinations of module swapping you should be able to check which module is defective.
3)Replacing with known good module
If you are unable to use either of the above two techniques, you are left to use known good modules and selectively replace of modules one by one to pin point the memory failure. This is the easiest way to detect memory failure.
Hardware memory Tester
Hardware Memory testers are designed for PC service professional who need to test relatively high volume of modules and not for those who test only one or two modules.
Most reputable Hardware Memory testers are able to detect the most common errors, including assembly short, open and a bad cell on the ram chips. The automatic identification features also provide benefit to memory reseller who must deal with a lot of unknown type and configuration of modules.
Majority of the low end memory tester are relatively easy to use and documentation are always provided - this means that you do not require a specially trained engineer to setup and operate the tester unit though care must be taken that the test parameters are properly setup.
Hardware Tester
The SP3000 memory tester from CST is designed for service professionals and PC system manufacturers, this tester will support a wide range of memory modules by using different adapter, which can be swapped very easily.
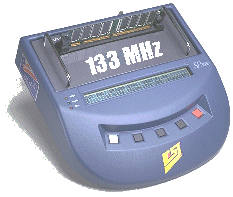
The standard adapters provided supports testing FPM and EDO (both 72 pin and 168 pin) and PC66/PC100/PC133 SDRAM on an optional SDRAM Adapter.
One of the key features of a memory tester is its ability to detect :
a) Type of memory
b) Memory Size & Configuration
c) Speed of the memory or the access timing
d) Different Frequencies especially for SDRAM memories
e) Voltages of modules for DRAM modules
f) Program the EEPROM on the module
g) Pin-point exact location of failure within seconds
A virtual Demo is available Goto Virtual-Demo If you are interested to find out more about the tester.
Basic Tester Description
The SP3000 is a small bench-top, portable memory tester that is equipped with a 2-lined by 40-character LCD display for test instructions and test results. A set of 5 push buttons are lined along the front panel for input and test selection. For those wanting to keep a hardcopy of the test results, there is an on-board parallel port.
The tester has a communication port for connecting to a PC for firmware updates or for displaying the test results onto a PC monitor screen. The interface kit is an optional accessory.
Basic Operation
Setting up for the first test is very simple, basically you need only plug in the appropriate adapter, insert the memory module, plug in the DC Power adapter and turn on the power switch. Within a couple of seconds, the LCD will display a menu for you to select your test by using one of the 5 function keys.
There are 4 test patterns available for testing the memory, which include Walk Address (1's and 0's), Walk Data (1's and 0's), Marching (1's and 0's) and Checkerboard.
For the SDRAM testing additional patterns will include Burst Read, Burst Write, Chip Select, DQM, and SPD information.
One of the neat features of the tester is the Auto ID capability, which will identify and display the module configuration when the appropriate function key is chosen. This is especially useful in a situation where the memory being tested is of an unknown origin. The information provided includes the memory type, row and column configuration, refresh rate, number of banks, number of data lines and the operating voltage.
If the module being tested is a known configuration, the unit has 8 standard devices and allows for several user-defined devices to be stored. These device files contain not only configuration, but also the test patterns to use, access timings, address and bank control and other parameters, which may be important to the specific module. The SPD information can be stored as well, and after the test is completed can be written to the serial EEPROM chip.
Test Results
We were able to test a number of different modules, including 72-pin EDO and FPM, and 168-pin PC66/PC100/PC133 SDRAM.
We tested modules with various parameters, including changing the access timings, until the module failed the tests. At that point we would then plug the module into a motherboard which allowed various speed settings and tried to run them at the fastest successful speed we tested, and the speed that failed.
Who needs this?
This unit is designed for professionals who need to test relatively high-volumes of modules, and not for those who need to test only a few modules per week (or less), as there are lower cost alternatives. CST also sells very high-end units for OEMs and large memory manufacturers, but these are extremely expensive and out of range of the smaller systems integrators and component manufacturers. For these companies, the SP3000 seems like an inexpensive alternative.
For those businesses who must deal with a lot of modules of unknown origin (specifically service oriented businesses), the automatic identification feature will provide some benefit, however as shown in our tests setting up the parameters correctly is critical and subject to error when the module configuration frequently varies between tests.
The relative ease-of-use and well-written documentation means that it doesn't require a specially trained engineer to setup and operate the unit, though care is required to make sure all parameters are correct
Techniques for troubleshooting Memory failure using Hardware Tester.
Hardware memory testers are very accurate machines that will pinpoint exact location of memory failure, typically this are the failure message you will expect from a tester.
Equipment using a CST SP3000 Memory tester
Memory Module - 16MB SDRAM Module
Example 1
Fail Walk Data Test -DB 4 , 6 ,7 ,9
In the example the tester fails walk data - at data bit 4 , 6 & 9 walk data is designed to detect opens and shorts and connection problems on the module. With the aid of a trouble shooting guide provided in the tester manual, users would be able to identify exactly which chip is faulty.
Inserting this defective module onto a motherboard ¡V the memory failed to boot-up during power up, therefore a software diagnostic will not be capable of detecting the failure.
Example 2
Fail Marching Test DB 40, 41 ,42 ,43
In the example , the tester fails marching test, at data bit 40 ,41,42 & 43 , Marching test is designed to detect functional failure such as decoder and cell interaction problems on the DRAM chip. With the aid of a trouble shooting guide provided in the tester manual, users will be able to identify exactly which chip is faulty.
Inserting this defective module onto a motherboard the memory boot-up during power up, but fail on Window start up.
Conclusion to Part Two
Being able to use the tools provided are important for you to decide if you are facing a memory problem. In part 3 which will be release in the next couple of weeks (I will be making a trip to Taipei to attend the Computex show from June 5-9, hopefully I can bring you back some juicy news - do check back soon.
By: DocMemory
Copyright © 2023 CST, Inc. All Rights Reserved
|
|
|
|
